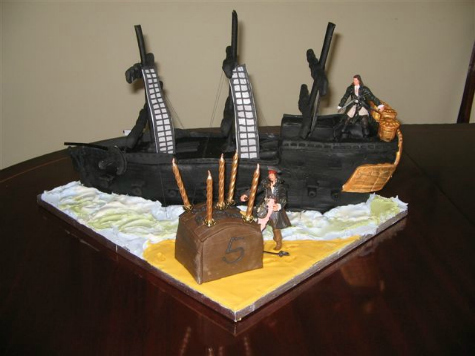
Pirate Ship Birthday Cake
My mother once made the best pirate ship birthday cake I have ever seen, for her grandson. It was so good that I want to share the recipe with you, and I have managed to persuade her to write it down.
Making this cake will require a certain amount of skill - I would not recommend it for novices. My mother is not a professional cake maker, but she has been making birthday cakes for quite a while now. Anyway, she assures me it was not as difficult as you might think, and she had a lot of fun making it. If you do decide to follow this recipe, we hope you have fun too. Good luck. ~ P.Perro
How to make a
Pirate Ship Birthday Cake
by Mrs Perro
If you are making a novelty shaped cake, Medeira cake is ideal. It can be carved and will keep for up to two weeks.
To make the cake you will need:
- 12oz of butter
- 12oz of sugar
- 12oz of self-raising flour
- 6oz of plain flour
- 6 large eggs
I used a lined 20cm (8 inches) square cake tin.
Bake for approximately 75 to 90 minutes at 160C / 325F / Gas 3
To test and make sure your cake is cooked, poke a cocktail stick in the
middle of the cake and if it comes out clean, then it is cooked.
Let the cake cool and then cut in half. Wrap both halves in foil and
freeze. You will find the cake a lot easier to carve and shape when
frozen, and you'll get nice clean edges too.

You will need about one and a half of the two lengths of cake for the
main body of the pirate ship. The rest of the cake can be used to
raise up the levels (mainly at the back).
I used apricot preserve to stick cake to cake AND icing to cake.
To decorate the pirate ship birthday cake I bought:
- Ready made black and a little white sugarpaste (ready to roll icing)
- Some gold edible dusting powder for the lights and cabin on the back of the ship (a small child's paint brush does the job.)
- Thick liquorice sticks for the masts.
- Little pirate figures. They are of course from Pirates of the Caribean (as is design of the Pirate Ship birthday cake) but any pirates will do. My grandson loved the figures and of course they were left when the cake had gone.
Ladders were shaped and cut from some of the
white sugarpaste, then I painted the ladder with a little of the black
sugarpaste, mixed in a little water to give a thick runny mixture
Sails were shaped from a little of the black sugarpaste.
Lights - shaped by hand using a little of the white sugarpaste, dust
with gold powder. These can be as simple or as detailed as you wish.
Anchor, Guns and Gun Holes, Barrels and Hatch - all moulded and cut by hand and again can be as detailed as you wish.
I covered the board with blue and white royal icing to give a sea
effect and made a treasure chest for the candles, then placed it on a
yellow sandy area.
Some tips
I tied thread to
each side of the masts and pinned it to the board, ( under the icing ).
It gave a good effect and supported the masts.
I used apricot
preserve to cover the cake before putting on the icing, this helped the
icing to stick to the cake and tasted good too.
Once the cake is completely covered, a little water was all I needed to stick the icing to icing.
I used straight pins while waiting for the icing to dry and stick... YOU MUST REMEMBER TO TAKE THESE OUT when dry.


